Blog
-
Database Connection and Firing Stance 1/02/2019
Database Connection Design
After developing a simple player inventory class and UI, I decided to add randomised or predetermined items to it to test its functionality. Originally, similar to the previous turn based project, I had intended to randomly generate weapons and items for the player to pick up. However during this process I realised that this system would require a large amount of depth and complexity to work as I had intended (to generate unique weapons) otherwise the items would feel to plain and generic. As such I decided to follow a similar approach to other titles in the genre that have been previously mentioned, and add a set list of weapons and items. Although this might take a lot longer to design, the end result will be more effective than the alternative. To do this I decided to store all the information required inside a database.
The database currently contains two tables, weapons and items. The weapon table contains simple information such as: name, damage, damage range, spread, rate of fire, max ammo, mag size, range, crit chance and the file path for the relevant sprite. The Item table contains similar fields like name, type and image path but also contains a string value for the effect. Effects will be denoted as a string of characters, the 1st being the modifier (+,-,/,*) which will store the operation that will be performed. The 2nd and 3rd characters will show the stat that will be changed by the item (e.g hp, sp), and finally the 4th and 5th will be two digits showing the magnitude of the effect. The effect this will have will change based on the item type that is stored in a different field.
Database Connection Implementation
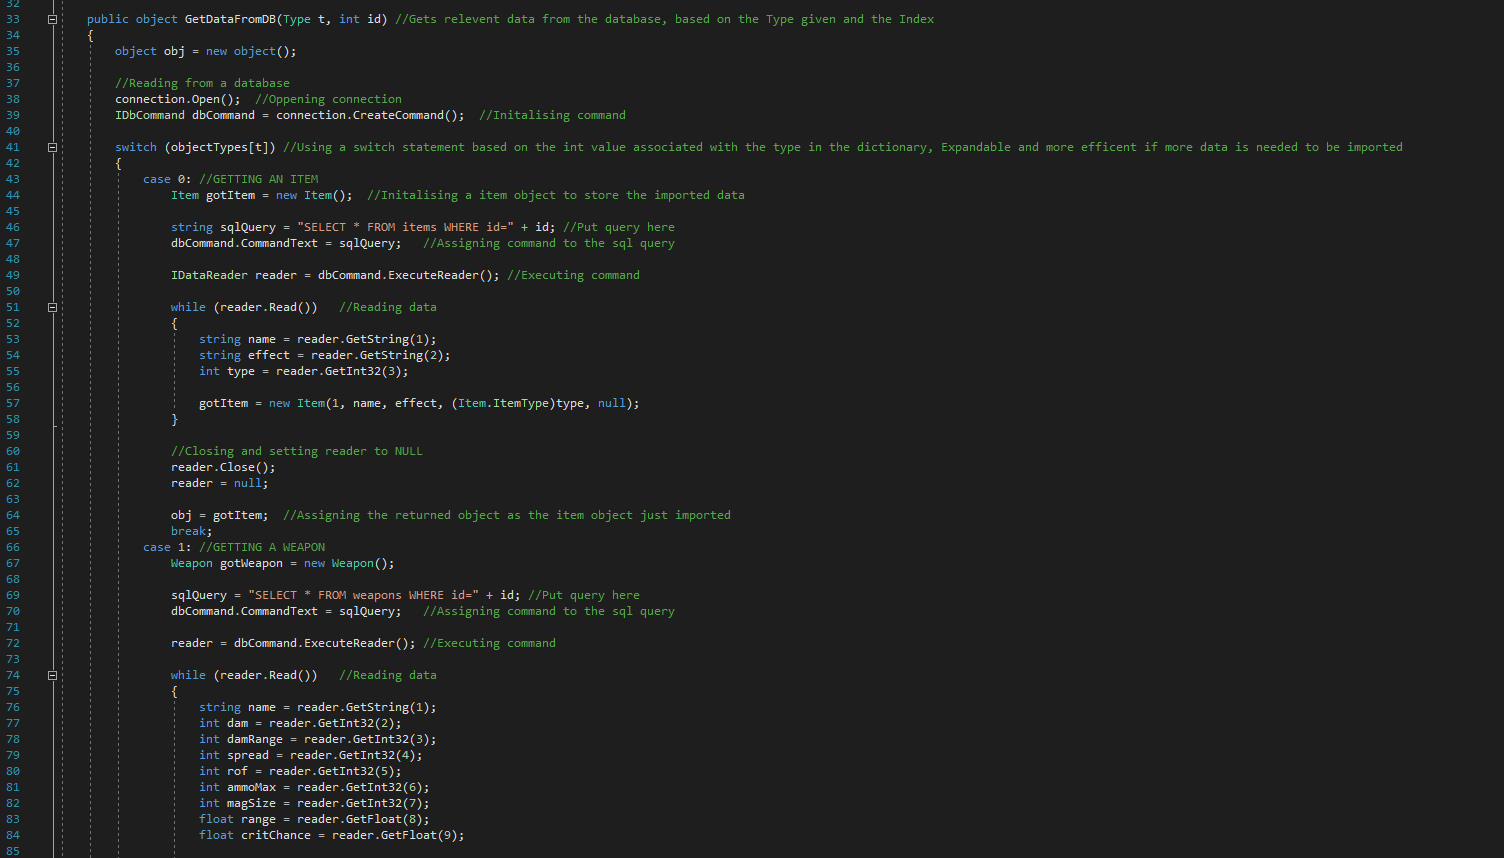
To get data from the database I am using a plugin called SQLite along with some basic SQL commands in a new class called DataAccessor. This class currently has one public method called GetDataFromTable, which returns an object and takes the Type of the data we want to get plus an int id (the key we want to get). This then uses a dictionary (each type of data is assigned an int) and a switch statement to determine which steps to take going forward. I decided to use this approach, even though I currently only have two types of data, as it is easily expandable and will be more efficient than if statements when it is expanded upon.
Firing Stance
Along with this I also implemented a standing fire frame for the player sprite, as it looked a little unnatural to have the gun rotate in their hand during the idle frame. This frame will flip based on the angle between the player’s up vector and the current position of the reticle, I already had some similar code for getting the dot product of two vectors so I just reused that.
-
Rolling 24/01/2019
Rolling
The main issue with implementing a roll mechanic was the fact I would need to create a roll animation, as someone who has very little experience with animation this took a lot longer to implement than some other mechanics. The actual mechanics of the roll were very simple to implement, I simply hard set the movement vector to the last direction the player was moving in multiplied by the roll speed.
Ultimately I feel that this effect is passable, I would like to make a couple of changes later down the line. The first of which would be slowing the roll down as it progresses, meaning the initial speed of the roll would be high and slow down as it goes on. This would make the roll feel heavier and more natural. The other thing I’d like to add is some particle effects for when the roll starts (When the player sprite leaves the ground) and at the end (when the player sprite hits the ground). These changes shouldn’t take too long to implement but won’t have any effect on core gameplay, as such it’s not too important to make these additions right away.
-
Item Menu Design and Implementation 11/01/2019
Item UI
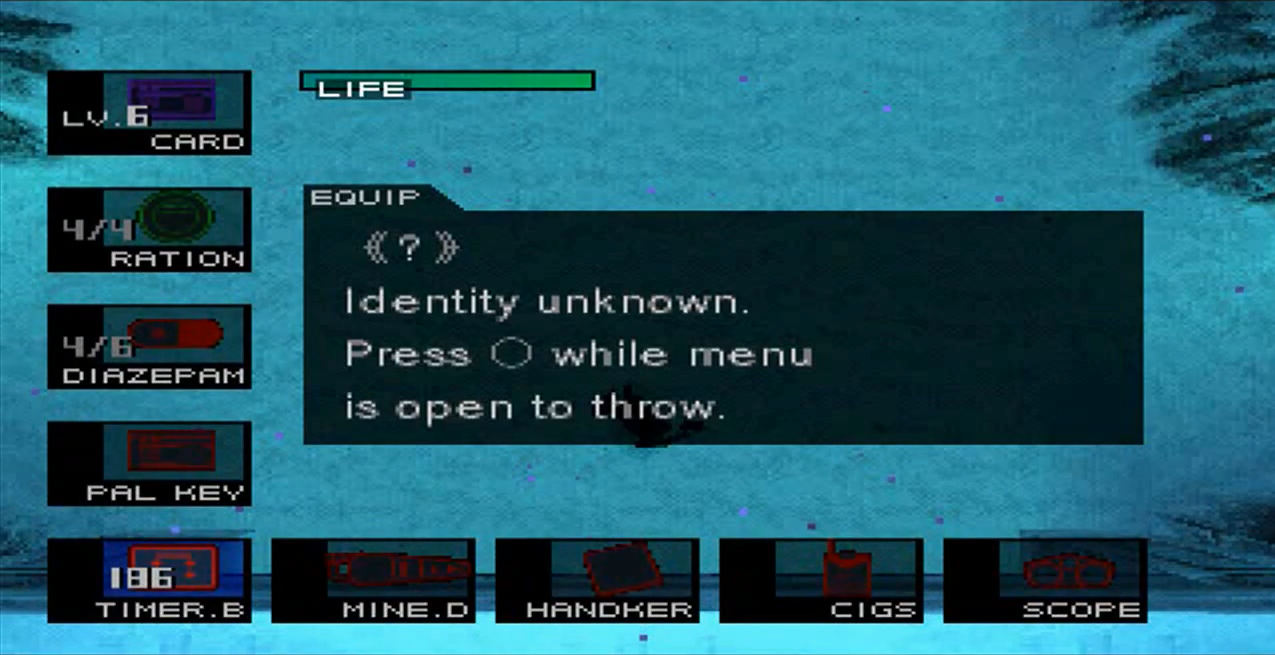
When designing the item UI I considered looking at two things: the way my influencers handled item selection, and how similar games handle item selection. One of my direct influences working on this project was the Metal Gear franchise. In Metal Gear items are displayed on the bottom left (Items) and bottom right of the screen (Weapons), with the current items or weapon being shown at all times. When the respective menu button is pressed the items are shown above and to the side of the current item, allowing the user to cycle through them.
I then looked at a modern game with similar mechanics, in this case, I looked at the game Enter the Gungeon. Enter the Gungeon has a similar item selection screen to the Metal Gear series. However, instead of having all the items listed all the way up the side and bottom of the screen, they opt for a more minimalist approach taking up less screen space.

Design
Ultimately I decided this style of weapon/item switching is not only still effective, but for me was evocative of the Metal Gear series and as this was my main inspiration for the game. I decided to go with it albeit with a few minor changes. Firstly the game will only show 3 weapon or item cards at any one time (there are however 4 item cards, one is hidden), this is for 2 main reasons. The first of which is that it saves on screen space making for a more minimal UI, and also allowing the player to see more gameplay while switching weapons. The second reason is that having every item be represented by its own UI object could cause performance issues. In order to achieve this, I would either need to instantiate a new UI object whenever the player picks up a new item (this would be resource intensive) or I would need one UI object for every item to exist from the beginning.
While I could scale up this method to cover the whole screen I think that this would be unnecessary as the core feel of this mechanic is maintained.Implementation
As previously discussed I decided to implement a limited box system. The core functionality of which would revolve around having 4 item boxes that rotate positions based on their position in an array. The positions in this array are as follows: 0 - Previous item, 1 - Current Item, 2 - Next item, 3 - Hidden items.
Firstly I update the item cards to display the relevant information (currently only changes the name) based on their position in this array (Note: only updated on cycle and menu opening). Once the menu input is given and the menu is open, I then check for a directional input to cycle the menu in. Once this is done the program shifts the item to the position of either the next or the previous (depending on the direction inputted). When all of the item UI objects are moved the relevant array is updated with the new positions in the array.
There are a few other touches I added, such as interpolating between the positions to make it a smoother process, but that’s the core concept of it. -
A change of plan 04/01/2019
It’s been a while…
Firstly I’d like to address the lack of posts to this blog. This is for a couple of reasons, the first being that the previous project was part of a university module and this form of documentation was something I decided to do independent of it. As such when it came to a few weeks before the hand in, my attention switched to putting the final touches on it rather than writing about it. Soon after the hand in I decided that the project was going in a direction that seemed unfun. The 2nd reason is that since finishing university my fulltime job has been trying to find a full-time job and working on projects to add to my portfolio. Which leads me to the point of this blog post.
A new(ish) project
I have recently started a new project that makes use of the procedural generation, along with other aspects of the previous project. The new project (as of yet untitled) is a top-down stealth shooter inspired by the Metal Gear franchise.
The current build is shown below
[More design documentation to come in the future] -
Updated Level Generation 21/03/2018
Changes
Procedural Generation
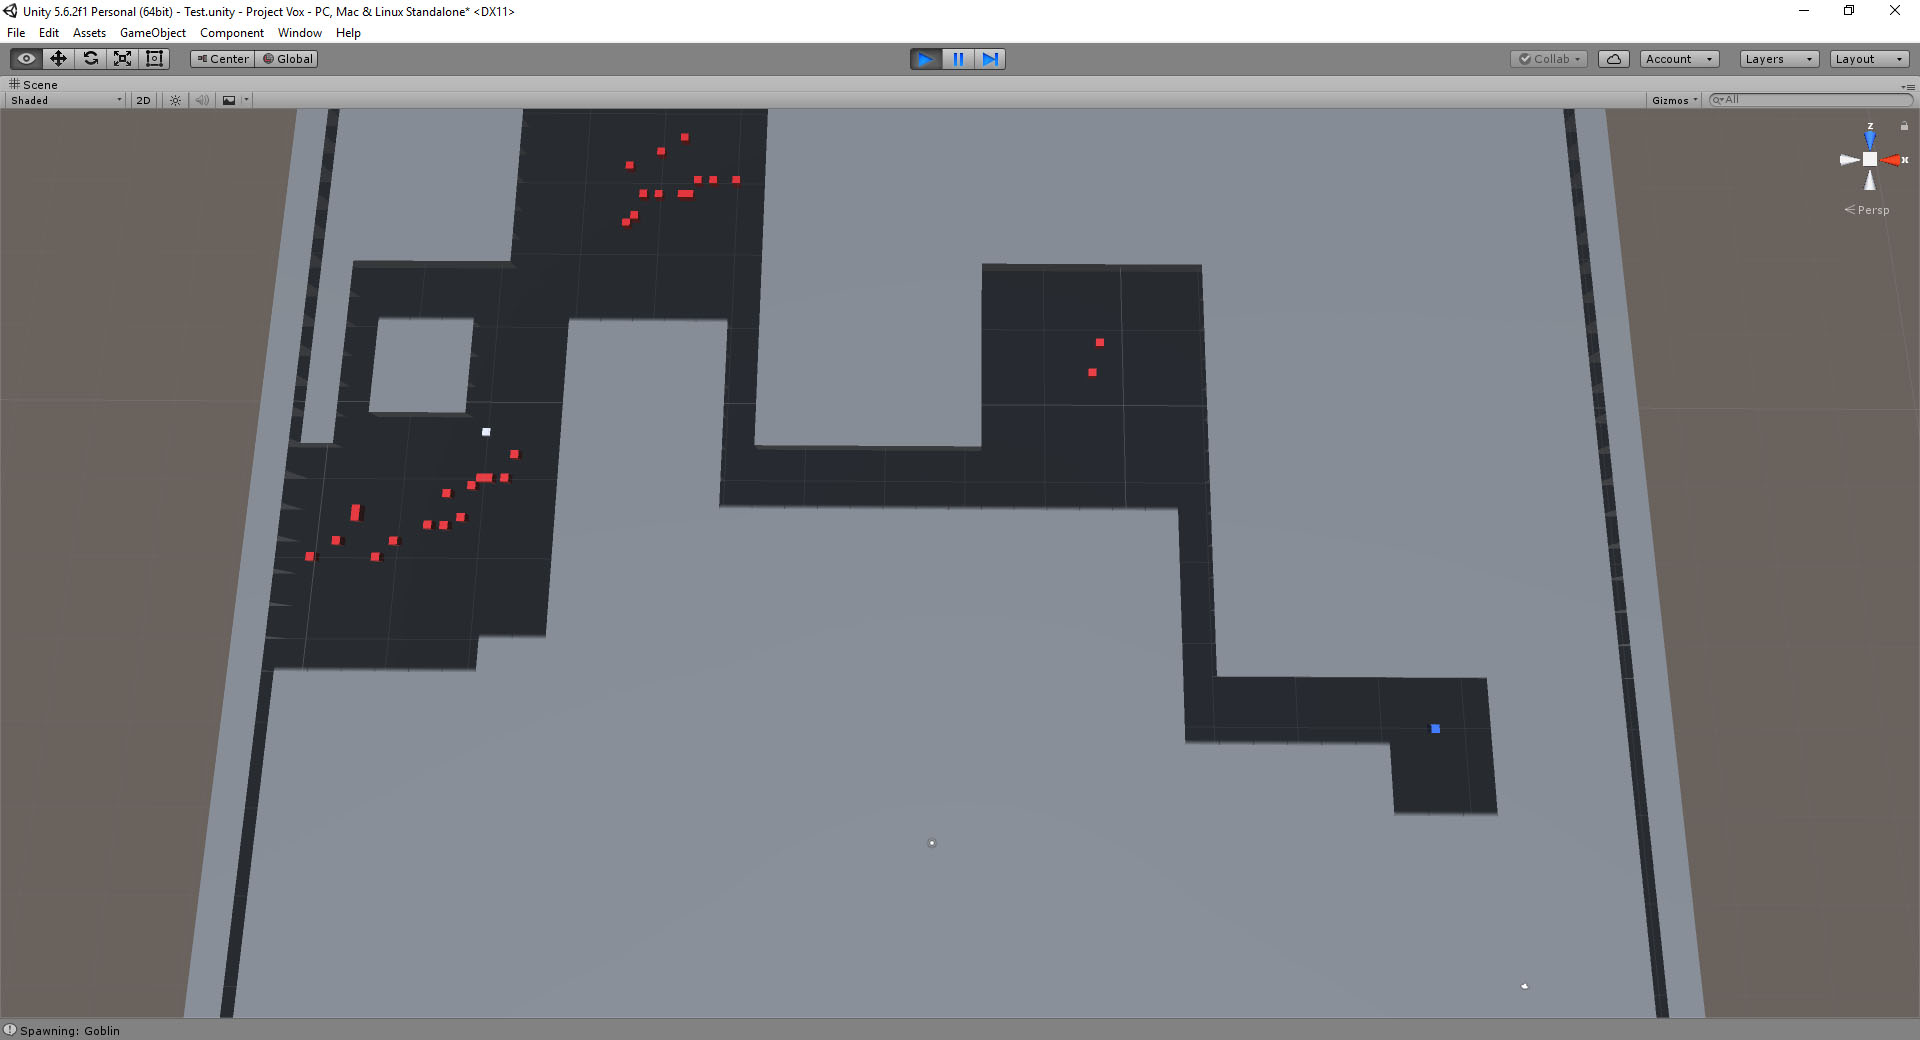
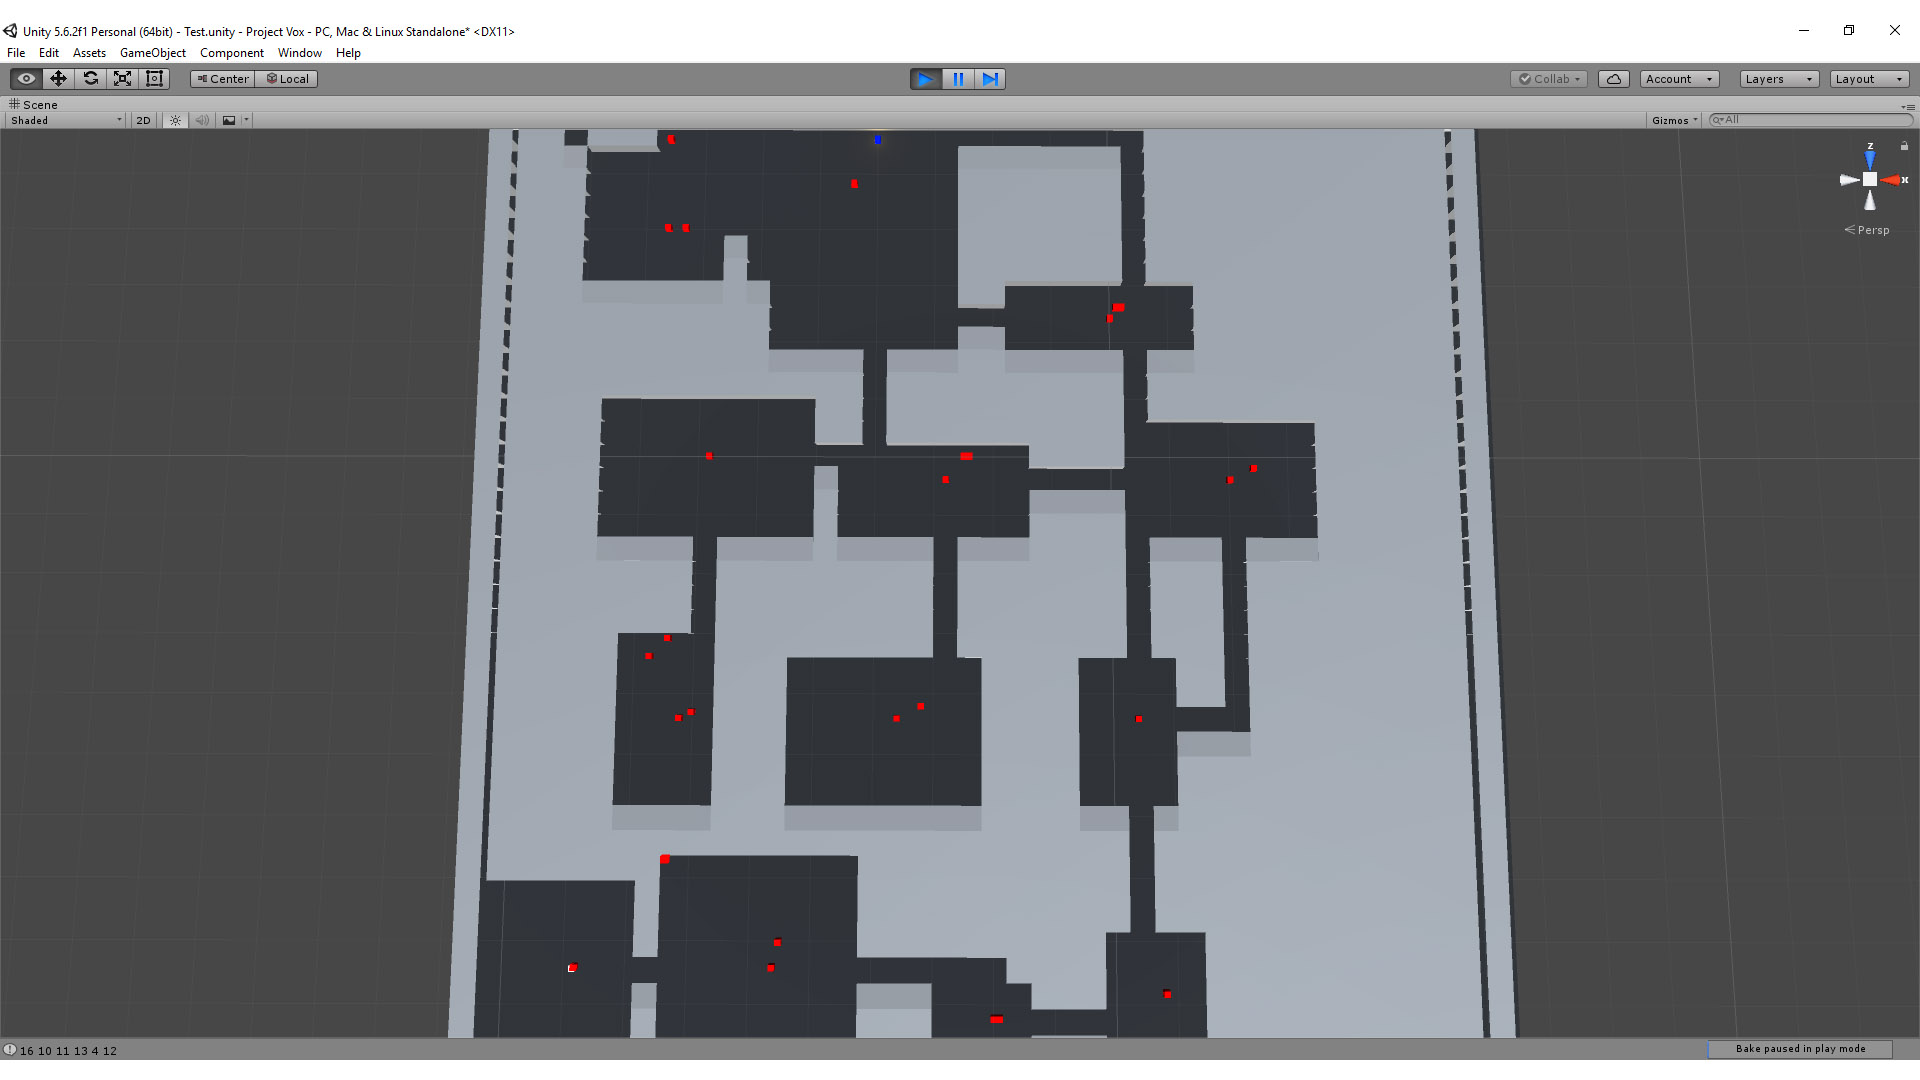
Firstly I have changed the way that the level is generated. Where before I used a goal first approach, I have now opted for a room first approach. What I mean by this is that before I would essentially be creating a path from 2 predetermined points, whereas now I create a series of rooms, ensure they are connected and then spawn these points. This results in a much less liner result, and will encourage the player to actively explore rather than following a path. This also means that the majority of the rooms are “optional” so anything spawned inside them is then a reward for the player.
What it used to look like:
What it looks like now:
Attacking
Another mechanic I have changed is how the player can attack. Attacking used to be handled using a raycast meaning attacks needed to be very precise in order to hit. I have now changed them so they are based on a selection of 3 hitboxes. These are narrow, normal and wide these should have enough variability to make the weapons feel feel different from each other.
Added
Turn System
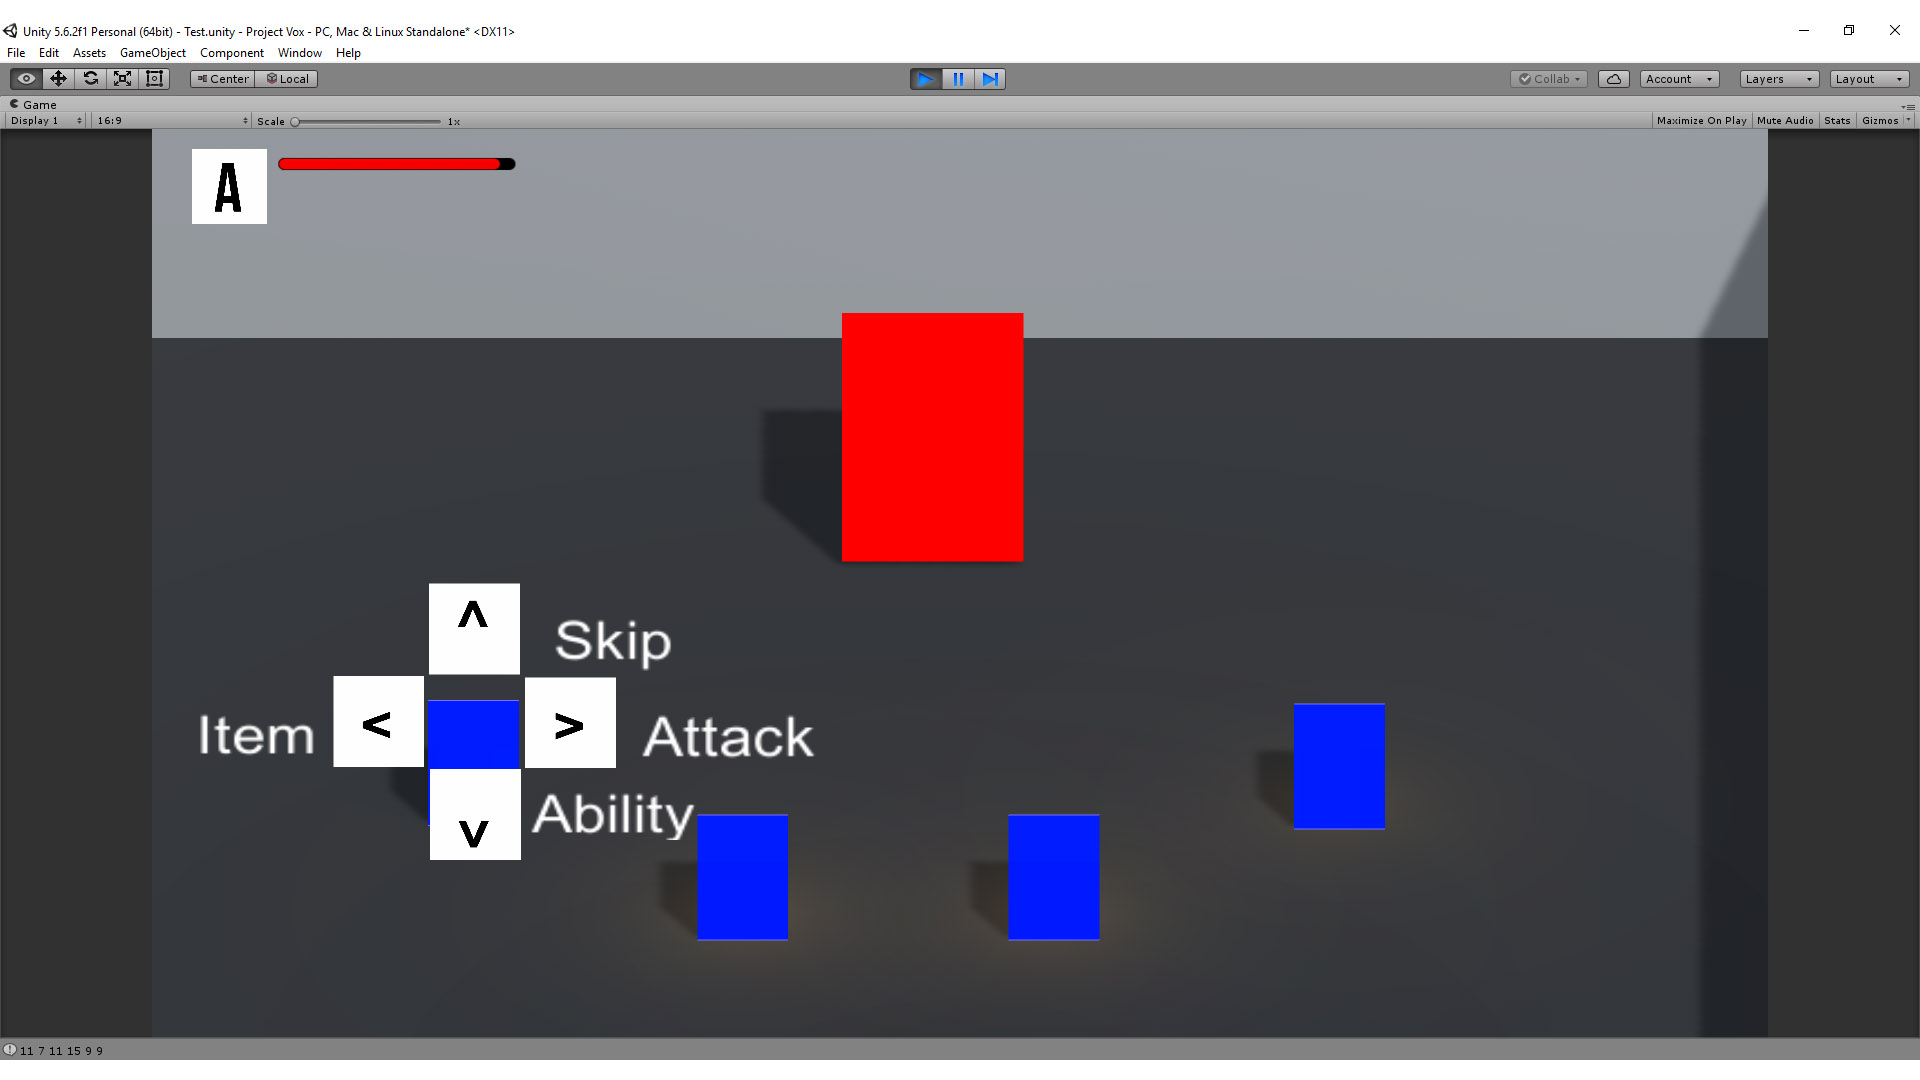
The first new mechanic I added was a basic turn system. When the player finds the boss it will trigger a method in the GameManager script, that will move the camera below the map where the party will be moved to. Opposite them is the boss / enemies, and all characters will be added to a turn order. The player is able to choose from 2 options currently: attack and skip, however an additional 2 options will be added in the future (Item and ability). Currently nothing happens when the player wins or loses however eventually they will either be reset back to the player hub (not yet created) if they lose. If they win they will be taken to the next level with the difficulty increased.
Stats Generation
The next thing I added was several methods for generating player stats, these will be used in additional party member generation to give them some variance. They are generated using a similar method to certain tabletop rpgs, by rolling 3d6s 6 times. These stats can be upgraded later on when that character levels up (not yet implemented). Stats are then changed based on the characters archetype / class, e.g. Barbarians get +2 to both strength and constitution. There is also a method to roll for health upon a level up.
Item Generation
Another mechanic I added was Item generation. An item can be one of 6 different types: heal, dup (damage up), aup (attack up), poison (adds a bleed effect to weapon attacks), armour and weapons. These also have a magnitude value associated with them that is used as a form of rarity scale, ranging from 1 to 2.5. These multiply the effects of the item. Items can be generated using the base constructor (totally random) ,or one of 3 others that allow to set a hard value for either the magnitude or item type (or both). These Items are stored inside the inventory class (inside a list of items).
Basic UI
Finally I added a very basic UI that shows the party members health and a basic turn UI that moves dependent on the current players turn.
-
Level Generation 19/02/2018
Design
The method for procedual generation that I have used is firstly generate a 2D array of cube objects, secondly spawn 2 objectives (Player and Boss spawns) and finally connect the 2 and generate rooms allong the way. At the center of these rooms I will create a monster spawner, that will spawn a series of monsters from the games database (More detail on that later). Later on I will be creating a script (or including a method in the same script) that will generate filler rooms where random party members will have a chance to spawn.
Implementation
How I decided to implement this was to firstly choose a random position on the 2D array to spawn using Random.Range(Between 0 and 39) and from that get a boss spawn (39 - player position x and z). After this I then would then create a 1 cube border around the spawn using the position minus or plus 1 in each axis. Then I used multiple if and else if statements to check if the boss spawn is above, below, left or right of the player spawn and then change the two variables up and right to either 1 or -1. A negative means the opposite of the named direction, e.g. if it is -1 up then the direction it is indicating would be down. I then add the up and right variables to the current x and z variables respectivly.
Then I enter a while loop, which repeats until the current x and z equal the boss x and z. In this loop I run another method called SpawnRoom() which creates a corridor by lowering the currently selected cube and adding either the up or right variables, this repeats a random number of times. After spawning a corridor the method then uses the same method to spawn a room of random dimentions. When the current x and z variables are equal to the center of this room a monster spawner is created.
The final result looks like this

-
UI Design 08/02/2018
Design - UI
Below are some images showing how the UI in the game should work. They aren’t extremely detailed, this is because the main focus of this project is the programming side. While I will still be creating these kinds of design documents, I ultimatly will not be marked on them at the end of the module.
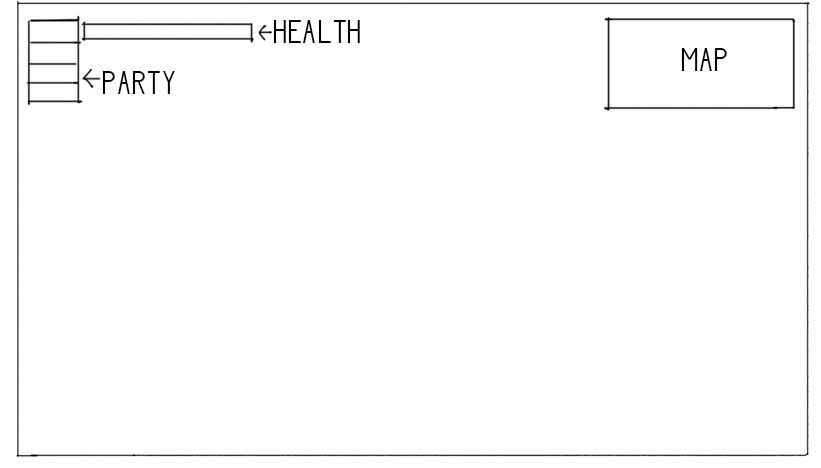
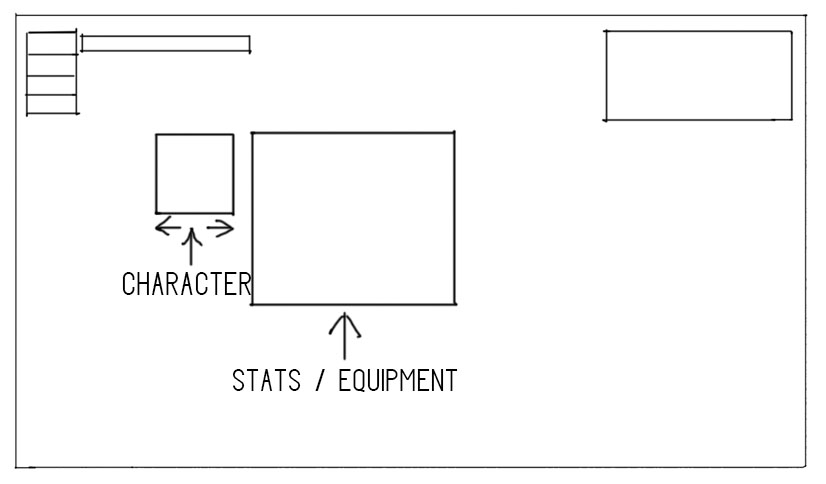
The first image shows the main UI, the health bar is in the top left and the party members (lives) are to the left of it. The current party member selected will be the one directly adjacent to the health bar, when the player dies this icon will be removed and the next one will be moved up. There will be a map in the top right of the screen which will show the area around the player, this is to make it clearer as to where the player has been / where they need to go. The second image shows the inventory / stats menu. This will show the player their currently equiped equipment and the stats of the current party member. This will also show the player’s inventory and allow them to use and equip items.
-
Design-UML 08/02/2018
UML - Class diagrams
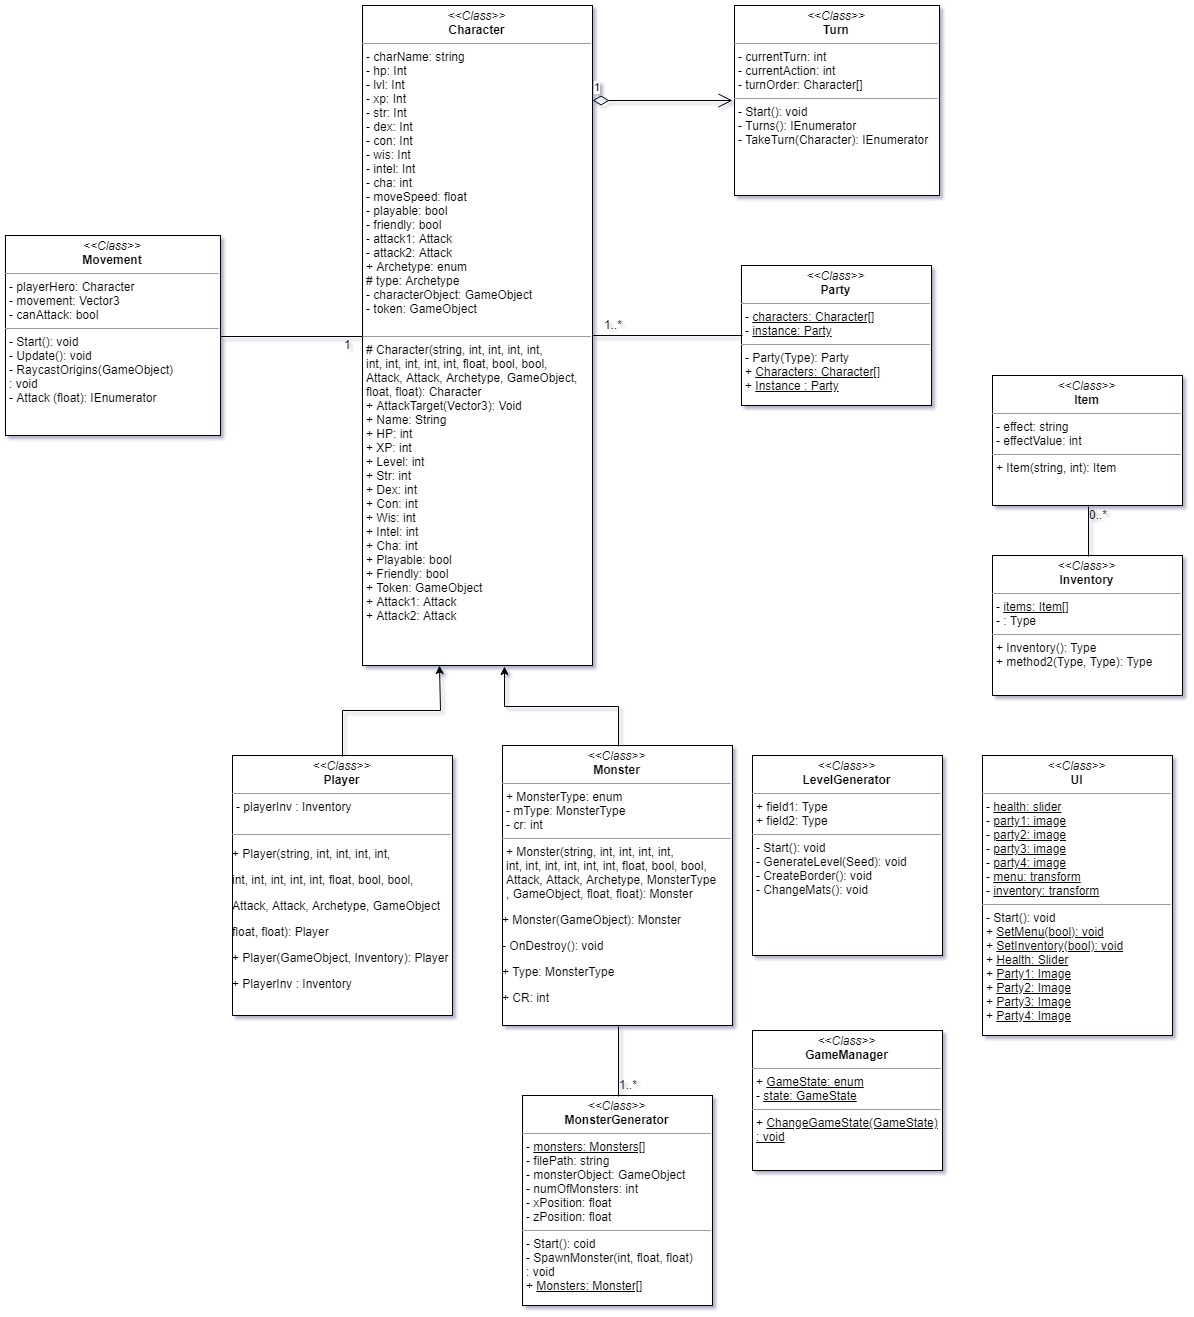
Below is a diagram showing how the classes will interact with eachother, although they might end up slightly different in the final product. I recomend you open the image in a new tab so the text is legible.
-
Turn-Based Roguelike Introduction 07/02/2018
Introduction
These posts will show the development process for a turn-based roguelike that I have decided to create for a university module. The main goal of this project is to attempt a unique style of turn-based gameplay. For the duration of this project I will mainly be focusing on the programming element, and the design thereof. The game will be developed in Unity using C#.
The Game
The game I will be making is a fantasy roguelike, which combines hack and slash mechanics for regular enemies with simple turn-based mechanics for bosses. The game will include RPG elements, such as a party and character stats, which will have different effects in the two styles (Party members will count a lives outside of a turn based scenario). The game should play like Darkest Dungeon meets Diablo.
The risks
The main risk I will face during the project is the fusing of two very different styles of games, and the difference in tempo. It will be important to keep the turn-based element fast paced so there is not this huge slow down when they get to a boss fight (which should be climatic). Another risk is that there are already a large amount of roguelikes on the market (e.g. Darkest Dungeon, FTL, The Binding of Issac) that are successful, my hope is that the amalgamation of mechanics will be enough to keep it unique.
Current progress
Currently I am in the designing phase, making UML diagrams and storyboards. However due to the risks I would be taking I would create a quick prototype of the game, which has some of the main mechanics (missing the party and turn-based systems).